I've been all about organizing. It all started with putting the Christmas stuff away and trying to get it to fit and be organized. I then started organizing some things in my closet. From there I wanted to organize my cupboards. I have been frustrated with our cupboards. thave ey are narrow width, narrow depth, and very tall with only three shelves. I end up with a TON of unused space. Over the 3 years we've lived in this house I have slowly been trying to *cheap* solutions to my unused space.
First I have been collecting the containers of the Costco brand Kirtland Signature Chocolate Covered Raisins and Almonds. They are all so useful. I pulled them all out. The flour container is from the Costco brand Kirtland Signature Animal Crackers. I put in the smaller containers: long grain rice, lentils, cracked wheat berries, and whole flax. I have a goal to use more whole, unprocessed grains. I figure if they are handier I'll be more likely to use them.
My husband wants to save jars for various uses, but in the mean time they are taking up a TON of space and leaving a TON of unused space. I cut out hard cardboard to create a second shelf. All of these use to take up two shelves and a half. Yeah I have shelf space again.

I did the same with these awesome 60's glasses. They use to take up a bunch of space in the back of this shelf. These cups are just awesome but not for everyday use. To store them I used the cardboard to stack the smaller cups on top of the larger cups.
Spice cupboard. This is metal stack-able shelves.
I had multiple boxes of fiber bars. I decided to combine them all into one box. Cut a whole in the bottom side, taped the side closed.

I had a bunch of boxes of Jello and pudding. I took the long heavy cardboard boxes (granola bar and fruit snack boxes from Costco). I organized in the box according to type and flavor.
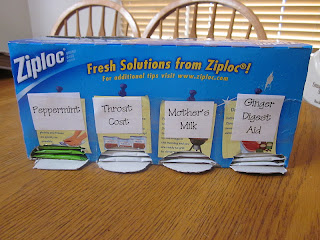
Cut up this box as a tea bag dispenser. I've had the boxes in there. One box for each type and it was a mess.
Would you be interested in how I made it.
I used the gallon ziploc bag box. Four types fit across, and the height is the same as a tea box.
FIRST:
measure out the four sections, and cut lips out for each section.
SECOND:
cut out the back side on three sides and tape up the ziploc punch out door.
THIRD:
Measure out cardboard for the inside dividers. Make them the same height and depth of the box. You'll need three of them.
FORTH:
Tape, I used packing tape, the board standing up on your divider markers inside the box.
FIFTH:
Place tea bag packages inside box in the dividers. Close the box, tape the top on the punch out lip. It will be just enough to hold it closed so that it can stand up without falling out the back.
SIXTH:
Place labels on front above each cut out lip so that you don't have to pull out a bag to know which flavor is which row.


