Showing posts with label Craft. Show all posts

Thursday, May 12, 2016

Teacher Gifts

I wanted to do something that was simple but also affordable.

I started on pinterest. Here are some I was considering

Then I started thinking about how they were all food. I started thinking about how teachers probably appreciate things that aren't going to go to their hips. But at the same time last year I did mason jars and we included Peach Herbal Tea with a note to enjoy their summers.
But if teachers not multiple of these, it is a lot of keep around- clutter.
So I started looking for things that aren't food, but once they are used there is no reason to feel the need to keep it.
then I found this one
I asked a teacher friend of mine which would you rather get, a Sharpie or a candy bar. She very quickly said "Sharpie" then asked her friend she was with (we were talking on the phone) and her friend said "Sharpie" without missing a beat. 
I bought a pack of Sharpies at Costco. It came with 25 Sharpies. It was $14. Maybe not the best deal but I needed them by tomorrow and it was a set of super fun colors.
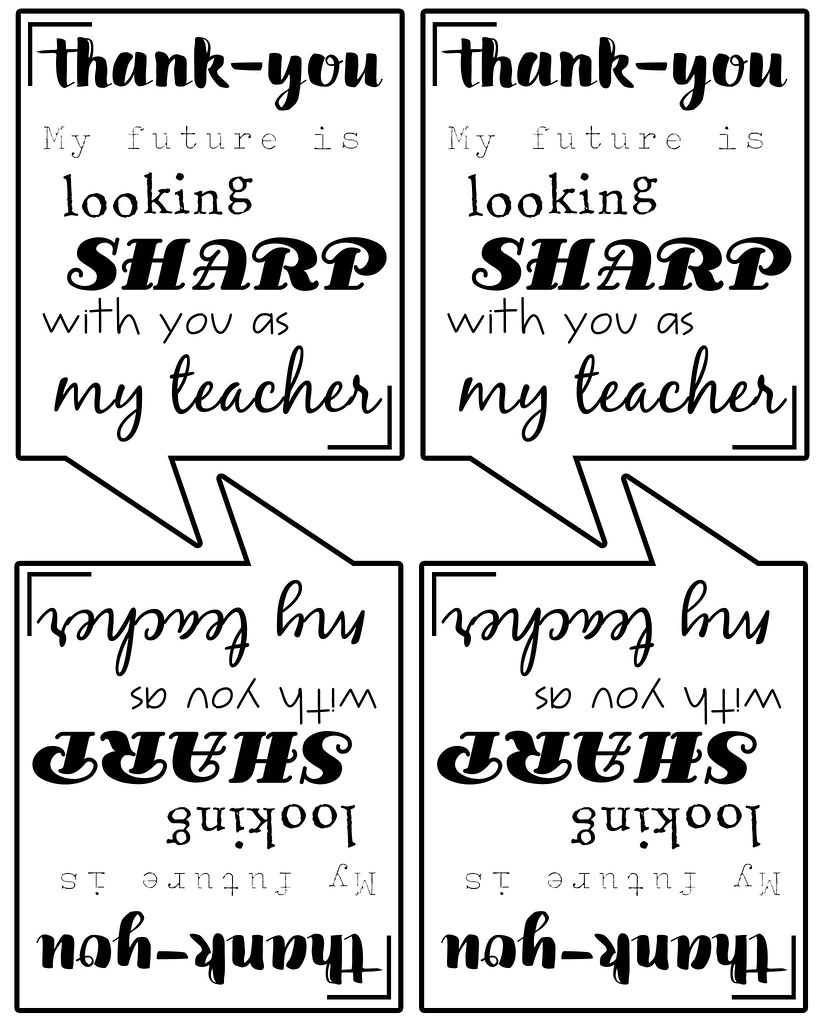
I made these tags for the Sharpies
(full size image, ready to print, please "save as" and print)
I'm giving the teachers 3 Sharpies each, the aids 2. I tied a ribbon around them.


Monday, December 31, 2012

Year in Review


Digital Scrapbooking is a thing for me. I enjoy doing it.
Created this LO for a site's challenge and thought I'd share it since it represents our year 2012 really well.

I have a whole blog dedicated to my digital scrapbooking. Check it out http://scrapingarizonagirl.blogspot.com/

Happy New Year.

Tuesday, March 20, 2012

Homemade stroller Rain covers

When we went on our last trip to Disneyland, when our son was only a month old, it rained on us. In desperation we purchased the ponchos in the park and tried to create a make shift stroller cover.
I remember when I was in England with my sister. We noticed that all the strollers there had rain covers already. My sister and I asked one lady where she had got her cover and she said it came with it.
This time around trying to prepare for our trip to Disneyland I wasn't going to let us waste our money on those over priced ponchos again. I was going to find a solution.
I bought one clear vinyl shower curtain. I measured it over the double stroller and then cut. I then pinned it on the sides to created corners folded over. I then sewed the corners.
I was thrilled with how well this simple solution worked.

There was barely enough left to create a second for our single stroller. It took me all of ten minutes per stroller cover to make and cost be total for the two strollers less than $3 for the shower curtain.
Now I can't say how well it worked for actual rain. It never rained on us while we were at Disneyland. It I ever get a change to use them in the rain I'll let you know, I just doubt I'll have any more opportunities.


Wednesday, February 15, 2012

Nursing blanket clips

I see clips to make any blanket into a nursing cover, they range anywhere in cost from $5 to $30. I started thinking about how nice it would be to have them but I didn't want to spend the money on it. I looked for clips to make my own, but I didn't really find anything. Until I found a set of sheet straps at the grocery store. I paid about $4 for a set of 4. Sure they don't have some ultra cute fabric covering them, but it works. Since there are 4 in a pack I have extras to keep in the diaper bag, the car, my house... I could always cover it if I really wanted the cute fabric.


Tuesday, February 7, 2012

Getting Organized

I've been all about organizing. It all started with putting the Christmas stuff away and trying to get it to fit and be organized. I then started organizing some things in my closet. From there I wanted to organize my cupboards. I have been frustrated with our cupboards. thave ey are narrow width, narrow depth, and very tall with only three shelves. I end up with a TON of unused space. Over the 3 years we've lived in this house I have slowly been trying to *cheap* solutions to my unused space.
First I have been collecting the containers of the Costco brand Kirtland Signature Chocolate Covered Raisins and Almonds. They are all so useful. I pulled them all out. The flour container is from the Costco brand Kirtland Signature Animal Crackers. I put in the smaller containers: long grain rice, lentils, cracked wheat berries, and whole flax. I have a goal to use more whole, unprocessed grains. I figure if they are handier I'll be more likely to use them.
My husband wants to save jars for various uses, but in the mean time they are taking up a TON of space and leaving a TON of unused space. I cut out hard cardboard to create a second shelf. All of these use to take up two shelves and a half. Yeah I have shelf space again.

I did the same with these awesome 60's glasses. They use to take up a bunch of space in the back of this shelf. These cups are just awesome but not for everyday use. To store them I used the cardboard to stack the smaller cups on top of the larger cups.
Spice cupboard. This is metal stack-able shelves.
I had multiple boxes of fiber bars. I decided to combine them all into one box. Cut a whole in the bottom side, taped the side closed.

I had a bunch of boxes of Jello and pudding. I took the long heavy cardboard boxes (granola bar and fruit snack boxes from Costco). I organized in the box according to type and flavor. 
Cut up this box as a tea bag dispenser. I've had the boxes in there. One box for each type and it was a mess.
Would you be interested in how I made it.
I used the gallon ziploc bag box. Four types fit across, and the height is the same as a tea box.
FIRST:
measure out the four sections, and cut lips out for each section.
SECOND:
cut out the back side on three sides and tape up the ziploc punch out door. 
THIRD:
Measure out cardboard for the inside dividers. Make them the same height and depth of the box. You'll need three of them.
FORTH:
Tape, I used packing tape, the board standing up on your divider markers inside the box. 
FIFTH:
Place tea bag packages inside box in the dividers. Close the box, tape the top on the punch out lip. It will be just enough to hold it closed so that it can stand up without falling out the back.
SIXTH:
Place labels on front above each cut out lip so that you don't have to pull out a bag to know which flavor is which row.

Saturday, January 21, 2012

Thankful Wreaths

We invited our play group over to make 'thankful wreaths'.
 They wreaths turned out really cute.  Al was proud of his wreath.
How did we make it?
Supplies:
  • construction paper
  • paper plate
  • scissors
  • glue
  • crayons 
How:  Cut the middle out of the paper plate. Find a leaf or a leaf on the internet. Use it to trace leaves on the construction paper. Glue cut out leaves around the edge of the place. Write with crayon things you're thankful for on the leaves.


Tuesday, November 15, 2011

Nightmare Mayor Costume

As I said in the previous post, I love to make and design costumes. My brother came to me wanting to be the Mayor from the motion picture "Nightmare before Christmas" He had already decided to just ware his suit, get a spider for the tie and find a red ribbon, but he needed the hat. I designed how to make it and made it for him.
Here is how we made it:
  • 2 Styrofoam cones tips cut off and glued thin ends together.
  • 2 polyester witches' hats
  • ~ 1ft of grey/silver duck tape

it turned out AWESOME.


Monday, November 14, 2011

Fairy Godmother Costume

My friend Amanda, wanted a fairy godmother costume to go with her daughter's costume of Cinderella. She asked me about making one because she knows I sew. I would totally love to make it. I love making costumes. My husband and I have discussed actually advertising the fact that I do custom costumes.
How we made it?
  • 1 pattern for a Jedi hooded robe (cut on fold so that it was closed)
  • 1 large old blue king size sheet
  • 2 yards of pink fabric
My favorite part is that I used a Jedi costume pattern to make it. Cut the outside from the blue sheet and the lining from the pink. We didn't line the whole thing just the sleeves and the hood. Then we made a waist belt tie to give it more shape. Looked awesome. thanks Amanda for giving me that chance. I've missed doing sewing.


Sunday, November 13, 2011

Happy Halloween


Happy Halloween
We had a long Halloween time. We went to my sister's ward's Trunk or Treat/Fall Festival on Wend. night, Friday was my parent's Trunk or Treat. Saturday we went to the Balloon Festival (that was suppose to have trick or treating so my son wore his Sparky costume), then Monday we went to my mother-in-law's office party cubical to cubical trick or treating. That evening we went to Aunt and Uncle and Grandma and Granpop's and we were done.
Little Al was "Sparky" the ASU Sun Devil mascot.
 My sister's family did a Star Wars theme, with her husband as Darth Vader, she was Padame, her son was Luke Skywalker, and her daughter was Leia. 
My son was totally interested in this candy thing. This year he got that he was getting candy, but I don't think I got him to actually say "trick or treat" to someone even once. 
Love this photo. Grandpa is trying to talk Princess Leia out of her Almond Joy (he says he wanted to give it to Grandma) 
My original costume idea didn't work out the costume as designed on the pattern looked HORRIBLE on me. So I only used part of it and said I was a Woods Nymph. We had fall flowers and leaves coming out of every part of my hair. 
My girls went as "Salt and Pepper" Rose was Salt and Nellie was Pepper.
They were just too darn cute! Wish I could say I made Little Al's "Sparky" costume, I purchase it 2nd hand from someone who had made it for their 2 yr old. I made my costume. I made the girl's hats, they are just knit and I found a pattern online. But their onsies and tights I bought.
Happy Halloween

Sunday, October 16, 2011

Fall Wreath

I'm not a crafty person. You may disagree with me but craftiness is not a first or second or even third nature to me. I always look at other people crafts and think I wish I could be crafty like that.
A friend of mine posted this link on her facebook page
I used the same looping idea they used, but I looped multiple times. Instead of the Glue Dots I used Styrofoam glue to connect the fabric to the Styrofoam. If you want to make such a thing I recommend the Glue Dots, the Styrofoam glue took forever to dry and it took forever to glue it. The Glue Dots make it quick and easy. I just was lazy not wanting to go to the store to get them.
 I wanted to make my wreath a fall wreath. So I can put it up as soon as fall starts and leave it up until right after Thanksgiving.
I love Fall

Friday, May 6, 2011

Maternity Blouse from a Man's dress shirt

I posted this on my craft blog (scrapingarizonagirl.blogspot.com). I figured there are probably other women out there suffering from the lack of variety in maternity ware. I keep thinking about how good this is for weddings too, not just family photos. Men's dress shirts come in just about any color.
Here is the link to my tutorial on my other blog. Sorry if it leaves too much out. I'm not a very good teacher. But it was a really easy project.
This is a picture of the trial shirt I made
And here is the finished shirt for our family photos
Check it out on my other blog, I hope it helps someone out there.

Saturday, November 13, 2010

Scraping Arizona Girl


Over the past year I become a digital scrapbooking addict. And that is saying something for a girl that dislikes paper scraps. 
I started a new blog to feed my addiction, scrapingarizonagirl.blogspot.com. Yes I'm a bit silly. But I wanted a way to share my most favorite LOs I do each week with those of my friends who don't digital scrapbook. I figured doing a blog might be the best way to do that. It was that or facebook, but I have a number of friends who still don't do facebook. So I thought this might be best.


So check it out and bookmark it. I plan on putting a few each week up. 
Thanks

Friday, November 12, 2010

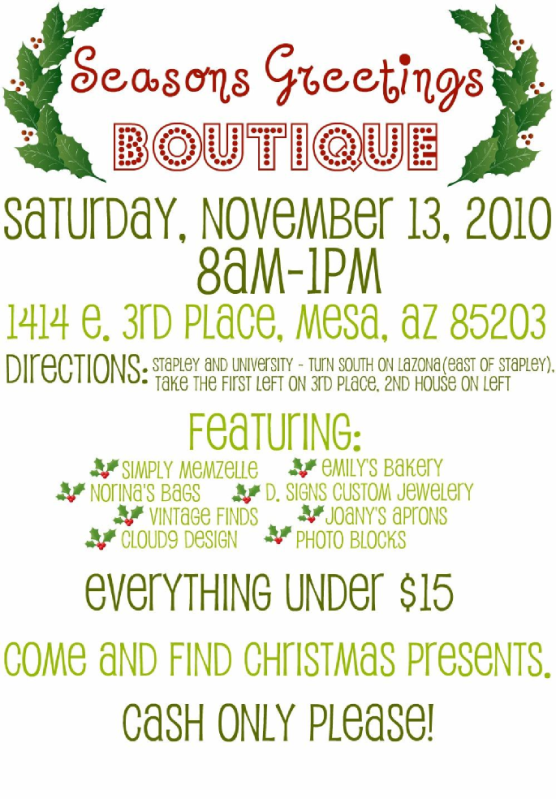
Season's Greetings Boutique- Saturday

Plugging my sister's business here. My sister, Kristy, and her sister-in-law, Marilyn make the most fabulous hair accessories. Its this Saturday, Nov 13th!! If you're in the Phoenix Metro area go by and see all the cool stuff at this boutique.